

The goal of this class is not to tell you ‘what’ to do, but why, and what changing each thing will yield. A lot of coffee making is intuitive and based on what we already know as coffee makers. Pretty much every coffee that we make is footnoted with ‘next time I’m going to…’. When you’re making coffee at home, sometimes it will be 24 hours before you pick up your grinder and have another crack. It’s easy to fall into a semi safe routine of making coffee you just think is ok. This will outline small changes you can make so you can keep on stepping up your game. My goal with talking to all of you today is I want you to be excited about the next Aeropress you make.
This class will be broken down into 5 sections: water, grinding, filtration, coffee and finally ratios and recipes. The first few might seem a little boring, but they are key for you to step up your Aeropress game and start making your coffee a little more exceptional.
Water
What do we need before anything else? Water in our kettle. How many people here are using tap water for their Aeropress? One of the biggest changes you will find in brewing at home is using filtered water of some kind. Tap water has extra minerals and ions that aren’t found in filtered water, and as such the coffee has less atoms it can jump across to. Pretty much, using filtered water makes your coffee taste ‘clearer’, less murky in flavour, cleaner, brighter and less oily. If you can, get yourself a brita water filter for your fridge, or use the filter from your fridge (it’s not perfect but it beats tap water) and try brewing a coffee with that water. It will taste instantly much closer to what you find in shops, I guarantee.
I am not much of an advocate for using bottled water, unless you have some grand plans for reusing them. That being said, there are some different brands of water that will yield different results too. Nice water from Tassie, NZ or Scandinavia will give you slightly different cups with similar results to filtering at home. If you have a spare bottle kicking around, it’s another thing you can try.
I also learned recently that adding a few drops of white vinegar or fresh lemon juice to your brewing water (seriously, just a few drops) will change the alkalinity of your water and again change the way these water particles will interact with one another. I haven’t played around with this too much, but it can definitely brighten up an otherwise dull cup of coffee.
Thankfully we don’t need a fancy temperature controlled gooseneck kettle for brewing Aeropress coffee. Temperature control can help with some things but it is absolutely not necessary.
Grinding
Who here has a grinder? I have a few thoughts and feelings about grinders I can tell you today. Firstly, there are many frustrating debates about what the best grinders are online. If you’re looking at upgrading, take into consideration if you want an automatic grinder or a hand grinder. Some people like hand grinding, and there are some very good quality hand grinders out there for $200+. I hate hand grinding and am willing to sacrifice a bit of quality for the ease of pressing a button. The Breville Smart Grinder is what I will use today for our demonstrations, it gives a good result, and has a pretty good particle range. A good grinder will have a low range of particle sizes, and having more of the same particle size in the middle of your grind distribution will increase clarity.
If you’re using a porlex grinder it’s important to know you will have a very wide range of particle sizes. It still beats having pre ground coffee after a couple of days in my opinion. If you have a breville grinder or even a porlex and want to try something, find a reasonably fine sieve (I think between 2 and 300 microns, it should say it somewhere on the sieve) and get rid of the fines. You will notice a change!
Filtration
I can guarantee for the most part you will have a lot of success with a good long rinse of hot water over your standard Aeropress paper filter. I will say you can achieve good results with a cold rinse too, as just an extra thing you can try where the body is a bit richer and the acidity is a bit more muted. As for metal filters, they will allow more oil to reach the cup, but often more grit too. These are great for travel but I don’t love them for everyday use, especially since you can compost your Aeropress papers. If you like big rich oily bodied coffee then have a go. If you run out of aeropress filters, have a go. There are also a brand called Aesir that are slowly entering the market that produce a similar result to using 2 paper filters. I’ll leave some with you today to try the difference, but you can also try using two regular paper filters. Or one paper filter on a metal filter.
I love Aeropress brewing because anything goes! Maybe if you tend to make multiple coffees, say one for yourself and your partners, or whoever you live with, you can try these little changes and swap cups. These little things will bring you closer and closer to making your favourite cup of coffee every day.
Coffee
Sometimes I speak to people who make Aeropress coffees, or coffee in general, and they say “Jimmy, mate, I’ve been making bad coffee at home”. I always ask what coffee they’re using. There’s a surprising amount of times the answer will be either something off the shelf at the supermarket or another roastery they don’t usually use.
Not all coffee is good. Not all coffee can be made really good. Some coffees are better than others. Most coffees are roasted differently. You will probably like different coffee to your friends. You won’t like all roasteries. Not all coffees have ‘sparkling acidity’ and ‘lingering complexity’ and are 90+ points or just a really solid 86. It’s a big world out there and unfortunately you’re not always gonna pick right.
I could talk about cupping and evaluating roast, I could talk about why some coffees are more acidic than others or sweeter. I could talk about light or dark roast coffees. But I’m just going to say, make sure you pick a coffee that you like! If you like our coffee here, drink more of it! We’re happy to talk about our products, we’re happy for you to explore origins and flavours. Other companies are too. You might like someone elses roast more than ours. Buy more of it! Drink what you like! It can be frustrating because 250g can be a lot to get through especially if you’re just drinking one cup every day or so, and if you’re stuck with something you don’t like then you’re stuck with a crap bag of coffee. Don’t beat yourself up, just pick something that you like or ask for tips on other roasters at your favourite shop. We’re all a big community here, happy to help you enjoy coffee.
Ratios and Recipes
This is the more fun part of our session today. This might sound a bit dense at times but I will try and give an explanation to help you understand it a bit better. Because of the plastic (low thermal mass, good insulation, it gets hot and stays stable in temperature) and the plunger aspect of Aeropress it doesn’t behave quite the same as drip coffee. Meaning you can brew quickly and push fast, you can brew at a lower temperature and push slow. You can agitate at different stages and experience different flavours. The list just goes on and on.
We talk a lot about ratios in the industry. Basically, we will talk about coffee recipes in terms of 1:whatever. 1:14 - 1:17 are the most common. The first number is ground dry coffee, the second is water. Coffees can taste good in a huge range of ratios, and for the most part I would recommend sticking between 1:14 and 1:17. But feel free to go out of that range. It will come at the cost of you having to lower temperature or change grind size or agitate more, but you can get some interesting results. Our coffees here are typically best at around a 1:17 ratio (or 6g to 100g water) but also taste very good at a 1:16 ratio. My go to Aeropress recipe at home is often a 1:14 ratio. I’ll explain what these ratios do to flavour later as I start making some coffees.
You have a lot of control over the brew time of Aeropress. A lot of people will say keep your brew time short. I don’t ‘disagree’ per se but I do think that a longer brew time of around 4 minutes will draw out more sweetness in the coffee and some people I speak to who brew Aeropress have never tried such recipes. A longer brew time will develop the sugars in your coffee more. When we evaluate coffee we typically let them sit in water for… 20+ minutes. So going overboard with time isn’t often the end of the world. That being said, you can brew a Kenyan coffee in a 90 second recipe and get a lot of acidity because those sugars haven’t had as much time to develop.
You have a lot of control over agitation. One reason why the ‘inverted’ recipe is popular is because it does the job of stirring before plunging. Plus you don’t lose any water at the start of the coffee making process. I will say when you fill up your Aeropress with water, stir so the grounds are evenly saturated. With the long plastic stirrer you have it will do this very well. Before you plunge, stir again, three or four times, back and forth very steadily. This will aid in extracting more flavour out of your coffee, and if you try stirring or not side by side you will notice the stirred one will taste ‘stronger’. This is necessary for making your aeropress taste better. I’ve seen some recipes that require lower temperature water and coffee stirred like, 20 - 40 times. If you are changing water dramatically, this will help make your brew taste stronger and you won’t run the risk of overdoing it. Just another thing to keep in mind.
You can brew with the cap down or ‘inverted’. I hate the inverted method because I always spill it or it comes apart when I’m not looking. The grounds for me often stick to the plunger part as well. It doesn’t work for me, but it might work better for you. It has the advantage of more evenly saturating the coffee, so there’s that. Again, try it, you might like it, you might not. If you don’t like anything you do or change don’t worry too much, some things work better for different people and that’s just the way it is. The inverted method is a good example of that.
Your target always is to have an even extraction. Flipping sometimes leaves some grinds stuck to the rubber bit of your Aeropress. That is not an even extraction. Sometimes if you stir in a clockwise direction your coffee will form a mound. That is not an even extraction. Sometimes you will press too hard and water will bypass the coffee out of the Aeropress cap. That is not even extraction. Instances such as these will leave more astringency and bitterness in the cup. Avoid these and (almost!!!) no matter what your coffee will taste pretty good. Make sure you don’t press really hard though, no matter what those Youtube tutorials tell you. It doesn’t make your coffee taste better.
Recipes
I know that was a bit dense, but here’s where we get to put some of these theories into play with the recipes section. First up, I’m going to show you the Tim Wendleboe recipe that I use most often when making Aeropress coffee. (Please note some bracketed letters will appear across the different recipes. These are just handy guides for you as a brewer, I don’t want to keep writing the same stuff and I want to streamline the reading of these recipes, so just check back if you’re not sure.
- Boil your kettle and let it cool off for a minute or two (or get your kettle to around 93-95 degrees). (a) If you’re a bit unsure, you can safely err on the side of hotter.
- Rinse your filter with hot water (f) reserve the water from rinsing your Aeropress paper and use it to water some plants in your house or garden, place it on the cap, screw it onto the Aeropress. Place your cap-paper-aeropress combination cap side down onto a server or drinking vessel of your choice.
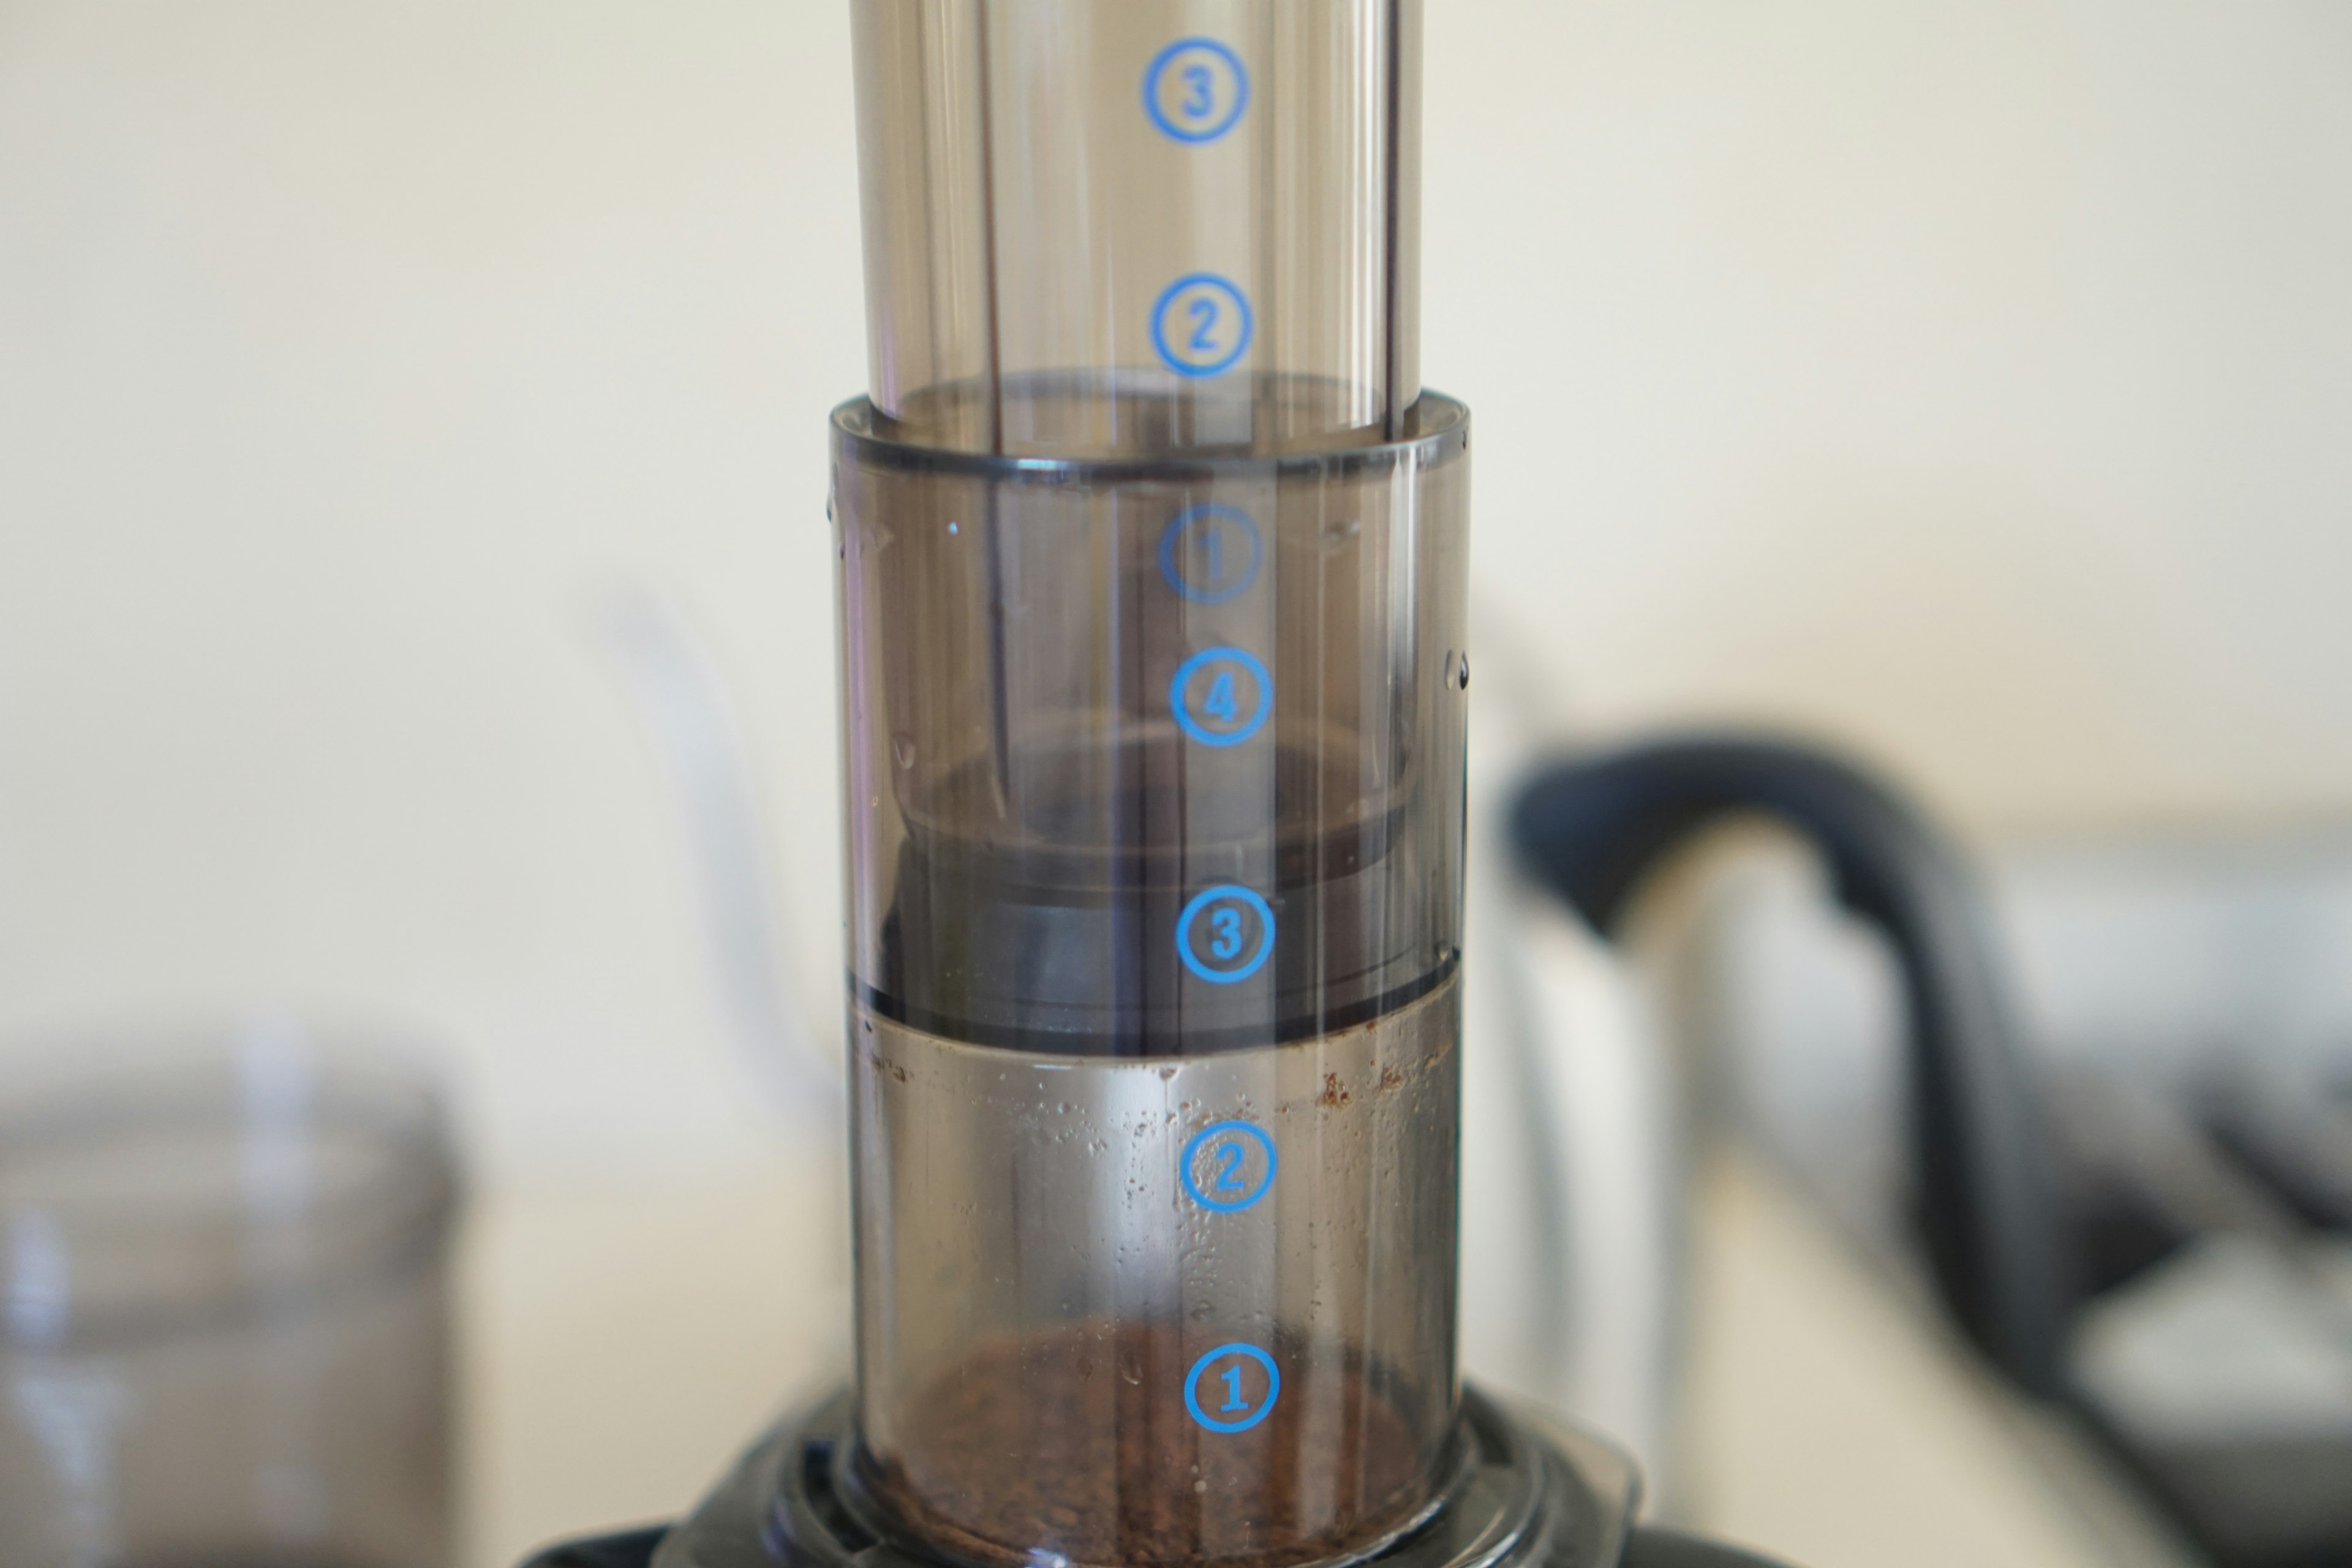
- Grind out 14g of coffee. (b) If the left is the coarsest and the right is the finest, grind somewhere around here on your grinder | X | | - lets call the size a 13 out of 20 with 20 being the coarsest and 1 being the finest setting on your grinder.
When plunging, you should be able to push with little resistance, but not so easily your plunger just goes straight down. If you’re still a bit unsure, you can safely err on the side of finer. - Place your 14g of coffee into your cap-paper-aeropress combination. Fill up with 200g of water, stirring 3 times slowly. Gently place your plunger on top, just enough to make a seal so the water stops dripping. (c) If you’re a maverick like me, you can instead place a plate or a small curved object that will fit snugly on top. What matters here is we’re keeping the heat in as I find the Aeropress won’t leak all that much with the right grind size anyway.
- Let the coffee and water steep for 60 seconds. After 60 seconds, take off your plunger or other object and stir the coffee and water, backwards and forth, steadily, 4 times. (d) I’m sure three times is fine too but I just like to be certain.
- Push down with little effort on the top of the plunger, with enough force that the water drips steadily. Stop plunging when you hear a hiss. (e) If you’re keeping time, this should take close to 30 seconds. If you’re watching, the coffee grounds should be completely flat against the cap
- Pull up the plunger slightly, so the drips stop, take your Aeropress to the sink and plunge again to expel all liquid. Take the cap off and compost your coffee and paper. Or make a coffee scrub. If you can’t do that, throw it out, I guess, and rinse your cap and plunger.
- Enjoy ☺
Thanks to the quick brew time, we get a very pronounced acidity. Thanks to the higher ratio of coffee to water, we have some extra sweetness to back that up. What you find with a coffee like a Kenyan (which we were brewing on the day) is a very expressive acidity at the expense of clarity. In coffee we usually call a coffee that tastes like that very ‘juicy’. Throw that in your flavour lexicon if you haven’t already.
Second up, I’m here’s a version of this that I think suits Sample coffee much better. We will be using a 1:16.666666666666 ratio aka 6g to 100ml. Having a longer contact time will draw out the flavour of the sugars more and bring more sweetness to the brew. When we evaluate coffee we let it sit for 4 minutes before “breaking” and agitating the brew. So really when you break it down you don’t have to worry too much about too much contact time, especially in immersion style brewing.
- Boil your kettle and let it cool off for a minute (or take your water to 96-98 degrees) (a)
- Rinse your filter with hot water (f), place it on the cap, screw it onto the Aeropress. Place your cap-paper-aeropress combination cap side down onto a server or drinking vessel of your choice.
- Grind out 12g of coffee. (b)
- Place your 12g of coffee into your cap-paper-aeropress combination. Fill up with 200g of water, stirring back and forth (d) steadily. Gently place your plunger on top, just enough to make a seal so the water stops dripping. (c)
- Let the coffee and water steep for 3’30 seconds. After 3’30 seconds, take off your plunger or other object and stir the coffee and water, backwards and forth, steadily, 4 times (d).
- Push down with little effort on the top of the plunger, with enough force that the water drips steadily. Stop plunging when you hear a hiss. (e)
- Pull up the plunger slightly, so the drips stop, take your Aeropress to the sink and plunge again to expel all liquid. Take the cap off and compost or make a scrub out of your grounds. If you can’t do that, throw it out and rinse the cap and plunger.
- Enjoy ☺
Next up I’ll be sharing a version of a ‘cold start’ brew recipe. I use a combination of a lower ratio (1:15ish) and a slightly longer overall contact time (with an even slower press), plus a short ‘brew’ time and extra agitation to make a balanced brew that highlights ‘juiciness’ as well as sweetness. It’s not perfect, and each year as Aeropress rolls around I will edit this more and more, but I think it shows a lot about what a low ratio, high agitation, long brew, lower temp can do in brewing.
- Boil your kettle and let it cool off for a minute (or take your water to 96-98 degrees) (a)
- Rinse your filter with hot water, place it on the cap, screw it onto the Aeropress. Place your cap-paper-aeropress combination cap side down onto a server or drinking vessel of your choice.
- Grind out 17g of coffee. (b)
- Weigh out 70g of room temperature filtered water
- Place your 17g of coffee into your cap-paper-aeropress combination.
- Add your 70g room temperature water, stirring gently to ensure the grounds are completely covered. Wait for 45s.
- At 45s, fill up with 180g of water, stirring back and forth (d) steadily. Gently place your plunger on top, just enough to make a seal so the water stops dripping. (c)
- Let the coffee and water steep for 1’15 seconds. After 1’15 seconds (the 2min mark if you’re counting from the start), take off your plunger or other object and stir the coffee and water, backwards and forth, steadily, 10 times (d).
- Push down with very little effort on the top of the plunger, with enough force that the water drips very slowly - so slowly it takes 1’30s to push all the way down. Stop plunging when you hear a hiss. You should push steadily enough the total time is 3’30.
- Pull up the plunger slightly, so the drips stop, take your Aeropress to the sink and plunge again to expel all liquid. Take the cap off and compost or make a scrub out of your grounds. If you can’t do that, throw it out and rinse the cap and plunger.
- Enjoy ☺
Finally, using Prismo from Fellow Products I’m going to demonstrate what a long espresso on the Aeropress tastes like. I’ll be following a similar recipe to what we use at Sample.
- Boil your kettle and let it cool off for a minute (or take your water to 96-98 degrees) (a)
- Preheat your Aeropress with Prismo screwed on by pouring some of your hot water in it, letting it sit for 30s and tipping it out (f). Place your Aeropress-Prismo-combination side down onto a server or drinking vessel of your choice.
- Grind out 20g of coffee. If 1 is the finest and 12 is the coarsest, grind at around a 3. If you’re unsure, err on the side of finer. If that’s too fine, go coarser.
- Place your 20g of coffee into your cap-paper-aeropress combination. Fill up with 98g of water, stirring back and forth (d) steadily. Gently place your plunger on top, just enough to make a seal so the water stops dripping. (c)
- Let the coffee and water steep for 30 seconds. After 30 seconds, take off your plunger or other object and stir the coffee and water, backwards and forth, steadily, 4 times (d).
- Push down with little effort on the top of the plunger, with enough force that the water drips steadily. Stop plunging when you hear a hiss. (e)
- Pull up the plunger slightly, so the drips stop, take your Aeropress to the sink and plunge again to expel all liquid. Take the cap off and compost or make a scrub out of your grounds. If you can’t do that, throw it out and rinse the cap and plunger.
- Enjoy ☺
That… just about covers a couple of interesting starting points for brewing with Aeropress. If you don’t have Prismo, you can try using a metal filter or a metal filter with a paper filter to provide more resistance and pressurise the chamber a bit more. Although I think prismo does the job very well.
If you like any of these recipes, please feel free to share them with your friends. If you don’t like these recipes, please feel free to contact me. I put a lot of work into the cold start recipe I shared in particular, and have found it works with mostly success but has the ability to taste underextracted in a lot of scenarios. Industry people - these recipes are geared towards home brewers, but pretty much all things still stand. Happy brewing everyone! Thanks for getting this far in the article Jimmy xx